How Long You Should Bloom Coffee
Learn the ideal coffee bloom timing for perfect brews. Discover how to optimize your coffee's flavor with our step-by-step guide.
Blooming is the brief pre-wet phase when hot water first meets grounds and trapped gas escapes. In practical terms, coffee bloom timing means how long you pause after that first pour before continuing the brew.
Most home brewers aim for roughly 30–45 seconds. This range is not random — it gives trapped gas time to vent and helps the rest of the water hit the grounds evenly. That small pause can lift flavor and reduce uneven extraction.
The bloom step is a simple part of the overall brewing process. Factors like bean freshness, grind size, water temperature, and brew method affect the ideal pause. Pour-over fans get the clearest benefit, but immersion methods can gain from a controlled pre-wet as well.
Success looks like a repeatable routine that improves each cup without extra gear. Later sections will define bloom, recommend ideal time ranges, and offer a straightforward at-home method plus troubleshooting tips.
Key Takeaways
- The bloom is the initial pre-wet step to release gas and prep grounds.
- Pause about 30–45 seconds after the first pour for most situations.
- Bean freshness, grind, water temp, and method change the ideal time.
- Pour-over brewers benefit most, but immersion can still use a bloom.
- Goal: a simple, repeatable routine for a more consistent cup.
What Coffee Bloom Is and Why It Matters for Flavor
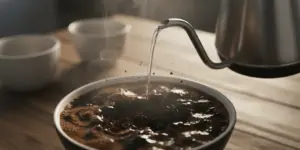
When hot water first wets fresh grounds, trapped gas escapes in a quick, visible rush. That first pre-wet is a short, intentional pause that helps the rest of the brew proceed evenly.
How carbon dioxide leaves the grounds
Roasting locks carbon dioxide inside roasted beans. When water hits the bed, CO2 and other gas push up as bubbles and foam. This release is normal and more dramatic with very fresh beans.
What Would You Like to Learn Next?
Choose an option below:
How pre-wetting improves extraction
If gas vents freely before the main pour, water can reach all of the coffee grounds more evenly. Better saturation early in the brewing process lowers pockets of under-extracted or over-extracted material.
What to look for during the phase
Expect bubbling, foaming, and a quick swelling or “puff” of the bed. Those visuals confirm the step is working and signal how active the roast still is.
How this changes flavor
Blind tastings show brews that include this pause trend richer, rounder, and fuller in flavor. Skipping it can leave a flatter, sometimes sharper taste—a clear difference in the final cup.

Coffee bloom timing: How Long to Wait for the Best Results
Start with a simple rule: watch the bed and count the seconds. For most pour-over style brews, aim for about 30 to 45 seconds. This window lets trapped gas vent and helps the rest of the water reach the grounds evenly.
The ideal bloom time window for most brews: about 30 to 45 seconds
If the bed shows steady bubbling but calms within that range, proceed with the main pour. Small shifts inside this window matter less than steady pouring and even saturation.
When extending to a full minute makes sense for fresh coffee beans
Very fresh beans that show aggressive swelling and lots of bubbles often benefit from 45–60 seconds. Wait until bubbling slows and the grounds stop rising—that signals the main CO2 rush has passed.
How bean freshness and degassing affect bloom duration and intensity
As beans age, degassing tapers and the pause shortens. Use the sight and smell of activity to tune your time.
How water temperature impacts bloom performance and aroma at 195–205°F
Use hot water between 195–205°F. Cooler water mutes activity and aroma. Too hot can extract harsh notes. Hot water helps you judge the finish by sight and smell.
| Condition | Recommended Duration | What to watch for |
|---|---|---|
| Typical pour-over | 30–45 seconds | Moderate bubbling, bed rise settles |
| Very fresh beans (≤2 weeks) | 45–60 seconds | Aggressive bubbling, pronounced swelling |
| Older/degassed beans | 15–30 seconds | Minimal bubbles, quick calm |
| Water temp guidance | 195–205°F | Supports aroma and clear visual cues |
How to Bloom Coffee at Home Without Overthinking It
A clean, repeatable setup beats guesswork when you want steady results at home.
Setup checklist: weigh a consistent dose, use a medium-fine grind from a burr grinder, and start with a 1:16 coffee-to-water ratio.
Pour-over technique
Heat hot water to 195–205°F. Add just enough water to wet the bed—about 2–3× the dose by weight—so no dry pockets remain. Pour slowly in controlled circles to wet all coffee grounds evenly.
What to avoid and why
Do not stir aggressively or pour in a single fast stream. That can cause channeling, where water takes easy paths and ruins even extraction. Uneven pouring makes a bitter or hollow cup.
Different methods, same goal
Pour-over needs the most precise wetting. A french press will show a foamy raft but keeps extracting during steeping. Espresso uses short pre-infusion to mimic this step under pressure.
Troubleshooting & quick workflow
No visible activity? Check grind, age of beans, or water temp. Bitter or sour cups point to uneven pouring or wrong grind size. Keep it simple: heat, wet, wait 30–45 seconds, then continue the main pour.
Conclusion
A simple pause at the start of brewing can change how the final cup tastes. For most coffee, aim for a 30–45 second pause, and extend toward 60 seconds when beans are very fresh and active.
The chain is straightforward: pre-wet releases trapped gas, improves saturation, and supports more even extraction—resulting in better flavor in the cup.
Watch the bed for bubbling and swelling to slow or stop; those visuals matter as much as a timer. Keep a consistent routine—same beans, water temp (195–205°F), and method—before you tweak variables.
Expect a richer, rounder taste when you include this step. For your next brew, pick one method, set water temp, bloom briefly, then adjust one thing at a time to lock in the benefits.
FAQ
What is the bloom phase and why does it matter for flavor?
How does carbon dioxide escape grounds during blooming?
How does blooming improve saturation and extraction?
What should I see during the bloom phase?
How does blooming change taste?
What is the ideal bloom time for most brews?
When should I extend the bloom to a full minute?
How do bean freshness and degassing affect bloom duration?
How does water temperature impact bloom performance?
How should I set up grind, dose, and ratio for a good bloom at home?
What is the pour-over blooming technique?
How much water should I use for blooming to ensure even saturation?
What should I avoid during the blooming step?
How does blooming differ between pour-over, French press, and espresso pre-infusion?
What common mistakes throw off flavor and extraction?
How do I troubleshoot no visible bloom or a bitter or sour cup?
Cold Brew with Single Origin Beans: Bright vs Chocolatey Results by Region
» Discover special tips and stories about coffee