DIY Wall Shelves That Don’t Damage Dorm Walls
Discover the best no-drill wall shelves for dorm rooms and more. Our roundup features top picks that won't damage walls.
Students and renters often need smart storage that keeps deposits intact. This guide looks for no-drill wall shelves that protect surfaces while giving practical display and storage space.

The roundup focuses on floating systems and other shelf formats that mount without permanent damage. It explains why gentle solutions matter for dorms, apartments, and off-campus housing with strict hanging rules.
Readers will see adhesive floating shelf systems, tension-pole units, clamp and over-door options, and leaning pieces that mimic floating designs. The picks emphasize capacity, stability, and fit for painted, tile, or glass surfaces.
Expect clear safety and weight guidelines, room-by-room uses from bedroom styling to kitchen utility, and buying tips for move-in season. The article also previews installation, residue-free removal, and when a traditional drilled solution still makes sense.
Key Takeaways
- Choose products that protect deposits and reduce damage risks.
- Match capacity to real loads like books, plants, and gadgets.
- Prefer tested adhesive floating shelf systems for painted and tiled surfaces.
- Consider tension, clamp, or leaning styles for different rooms.
- Follow removal tips to keep walls clean at semester end.
Editor’s top picks for no-drill wall shelves at a glance
These editor-selected storage solutions focus on easy setup and tidy, renter-safe results. Below are fast recommendations that span adhesive floating shelves, tension-pole caddies, clamp/over-door shelf units, and leaning formats for quick decisions.
Standout value: multi-pack adhesive shelf kits for students who need matching units at a low price. They save time and simplify room styling.
What Else Would You Like to Know?
Choose below:
Compact options: narrow shelf models and desk-mounted units fit tight study nooks and above-mini-fridge gaps. Look for cable cutouts or device holders for small electronics.
- At-a-glance: max depth, wall clearance, suggested storage (spices, mugs, skincare).
- Humidity pick: tension-pole stainless caddies for showers; dry-room picks for books and decor.
- Installation notes: typical set-up under 20 minutes; adhesive cure time 24–48 hours; peel slowly at low angle for residue-free removal.
| Type | Best for | Pack/price |
|---|---|---|
| Adhesive floating | Decor & light storage | Multi-pack, budget |
| Tension caddy | Bathrooms, corners | Single unit, mid-price |
Jump to room-specific sections to match picks to living room, study, or kitchen needs.
How we chose the best options for dorm-safe, damage-free installation
Choices were driven by how well mounts hold real loads and come off clean. The review team ran hands-on tests to compare adhesion, tension stability, and clamp security across common dorm finishes.
Testing criteria: adhesion, load, and surface compatibility
Adhesion tests measured initial stick and 24–72 hour cure. Teams checked painted surfaces, tile, glass, and sealed wood panels to see how micro-texture affected bond strength.
Load checks matched claimed capacity to real items: books, toiletries, potted plants, and small kitchen gadgets. Edge lips and guard bars were noted for preventing slips in high-traffic spots.
What matters in small rooms: footprint and storage-per-inch
Storage-per-inch tracked usable width and depth versus wall projection to show which units give the most storage for the least footprint. Spacing above outlets, and interference with baseboards or chair rails, was logged.
- Durability: humidity, temperature swings, and cleaning routines that affect long-term hold.
- Ease: included templates, level guides, extra pads, and how adhesives peel off without paint damage.
- Support: warranty and return policies to protect buyers if performance falls short.
No-drill wall shelves by category: adhesive, tension, clamp, and leaning
Below are four common mounting solutions, matched to rooms, surfaces, and load limits. This quick guide helps readers choose based on surface type, installation skill, and daily use.
Adhesive floating shelf solutions for light to medium loads
Best for: painted or tile surfaces that can cure before use. Adhesive pads work well for decor, small books, and toiletries when allowed proper cure time and even weight distribution.
Tension-pole shelving for bathrooms and tight corners
Floor-to-ceiling compression systems suit showers and narrow corners. They need no holes and transfer load to floors and ceilings, making them ideal for humid spaces.
Over-door and clamp-on shelves for dorms and rentals
Clamp units hang from door tops or frames and avoid contact with painted surfaces. They are easy to reposition and good for toiletries, keys, or mugs.
Leaning and freestanding shelf units that feel “floating” without holes
Ladder-style pieces lean on the floor and offer a floating look while bearing heavier loads. Pair one with a small adhesive unit for balanced storage and style.
- Tip: use guard rails or lips for mugs and plants to prevent slips.
- Stack vertically to maximize storage and keep paths clear.
| Type | Typical Load | Best For |
|---|---|---|
| Adhesive floating | Light–medium | Decor, small books |
| Tension-pole | Medium | Bathrooms, corners |
| Clamp/over-door | Light | Closets, doors |
| Leaning freestanding | Medium–heavy | Living rooms, entryways |
Dorm room essentials: maximizing vertical wall storage without damage
Dorm rooms gain the most when vertical space is used smartly and without permanent fasteners. Short, stacked units make the most of narrow walls and keep floors clear.
Command-style mounts and removable adhesives
Use removable adhesive systems that peel off cleanly. These pads work well for light-to-medium loads like snacks, chargers, and small plants.
Smart placement above desks, beds, and mini-fridges
Mount a shallow shelf above a desk to free the work surface. Aim for a 4–6 inch depth so items stay accessible and walkways remain open.
- Stack vertically to expand storage without extra hanging points.
- Keep safe clearances over beds and mini-fridges to avoid bumps or heat that can weaken adhesive.
- Use over-door mounts and closet interiors to shift frequent items off painted surfaces.
- Label zones for roommates and test placement with painter’s tape before applying adhesive.
- Limit adhesive-only units to light-to-medium loads; move heavy texts to freestanding furniture.
| Location | Recommended Depth | Best Uses |
|---|---|---|
| Above desk | 4–6 in | Supplies, chargers, decor |
| Above bed | 4–6 in | Small lamp, phone, lightweight decor |
| Above mini-fridge | 4–6 in | Snacks, small containers (keep heat clearance) |
| Door back / closet | 3–5 in | Keys, toiletries, daily items |
Quick removal plan: remove items first, then peel slowly using the stretch-release method to prevent damage at semester’s end.
Bathroom-ready picks: wall mounted shower caddies and organizers
Humid bathrooms call for organizers that resist rust, shed soap scum, and keep shower clutter tidy.
Stainless steel bathroom units beat plastic for long-term rust resistance and durability. Steel thickness and a quality coating matter; thicker steel with a rustproof finish lasts longer and cleans up easier.
Drainage patterns—slots, bottom grids, and raised lips—help bottles stay upright and reduce mildew on a wall mounted shower holder. Removable baskets simplify deep cleaning and drying.
Adhesive organizer vs. tension caddy
Adhesive shower organizers offer a low-profile, floating look and save floor space. They require smooth tile contact and careful pad placement—avoid grout lines for the best bond.
Tension corner poles support taller bottles and more accessories. They transfer load to floor and ceiling, giving superior stability in humid bathrooms.
- Measure grout lines; place adhesive pads on smooth tile only.
- Start with a modest load and increase after 24–48 hour cure.
- Use removable hooks for razors and loofahs to keep shelves clear.
- Ventilate: run a fan or leave the door open to reduce moisture and extend adhesive life.
| Feature | Adhesive Organizer | Tension Caddy |
|---|---|---|
| Stability | Good on smooth tile | High (floor-to-ceiling) |
| Capacity | Light–medium | Medium–high |
| Cleaning | Easy wipe; less hardware | Removable baskets; more parts |
Kitchen and pantry: no-drill wall shelves for spices, mugs, and gadgets
Compact mounting options keep cooking tools close at hand while freeing up counter space in tight kitchens.
Choose shallow shelf formats for spice jars and small gadgets to avoid bumps in galley kitchens. Under-cabinet hanging mug holder bars pair well with shelf units to multiply vertical storage without cutting into prep areas.
When weight matters, steel frames add rigidity for small appliances. Lightweight plastic works fine for spices and utensils. Group items by weight and use frequency to reduce strain on adhesives and help daily workflow.
Bathroom kitchen storage crossover units fit tile, glass, or sealed wood panels. They can relocate between rooms as needs change. Install away from direct heat and splashes—keep mounts clear of stove backs and sink spray to prevent adhesive softening.
- Use floating shelves for display cookware and reserve enclosed holders for messy items.
- Stack vertically near pantry doors but keep door swing clear.
- Label jars and rotate stock so older items stay accessible on higher shelves.
| Feature | Best Use | Typical Material | Mount Tip |
|---|---|---|---|
| Shallow spice shelf | Spices, small jars | Plastic or thin wood | Place 4–6 in deep; avoid stove splash |
| Under-cabinet mug holder | Mugs, lightweight cups | Steel bar | Install under cabinet front for easy reach |
| Rigid steel shelf | Small appliances, cookware | Steel | Use near stable surfaces; spread load |
| Bathroom kitchen crossover rack | Soaps, spice overflow | Coated metal/plastic | Mount on tile or sealed wood; relocate as needed |
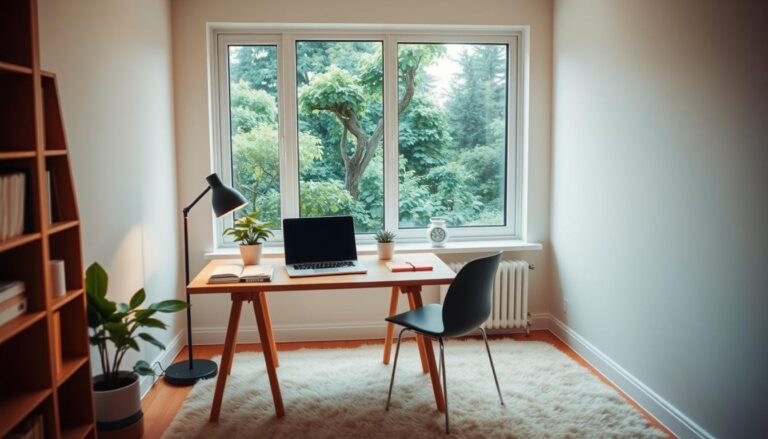
Home office and study setups: floating shelves for books and gear
A compact study area thrives when storage clears the desk and keeps gear in reach. Floating systems let students stage textbooks, peripherals, and small decor without crowding the work surface.
Cable-safe layouts route power and data with channels, clips, and a dedicated device holder. Keep cords off adhesive pads and secured with clips so mounts keep their grip.
Place a floating shelf above monitors for lightweight items. Maintain sightlines and allow monitor tilt and arm clearance before installing any shelf.
- Mix one deep shelf for bins with two shallow ledges for daily access.
- Space shelves 12–16 inches to fit binders and textbooks without crowding.
- Group units into study and display zones to separate reference materials from personal items.
| Use | Depth | Tip |
|---|---|---|
| Textbooks/Binders | 8–10 in | Use leaning units for heavy books |
| Daily gear | 4–6 in | Keep cords clipped and labeled |
| Display | 3–5 in | Keep decor light to protect adhesive mounts |
On smooth painted surfaces, mark anchor points with a paper template and use built-in levels for straight placement. Removable, wall mounted options suit renters who need clean removal at semester end.
Living room and bedroom styling with floating shelves wall displays
A curated grouping of floating ledges can turn a plain wall into a bold living room focal point. Simple groupings create a gallery feel without drilling. Mix heights and lengths to build rhythm and avoid monotony.
Use a tall leaning piece to anchor the composition and add small adhesive mini shelf accents to fill negative space. Keep heavy items off adhesive-only mounts; reserve heavier books for freestanding units or a single rigid shelf.
Color-coordinate finishes and frames to unify the bedroom and living palettes. Picture-ledge fronts help lock frames and collectibles in place in high-traffic living areas.
Lighting matters. Add underlighting or smart bulbs to highlight display pieces without raising surface temperature near adhesives. Refresh art and plants each season to keep the display fresh.
- Safe clearances: keep at least 8–12 inches above sofas and headboards and use light decor.
- Traffic flow: avoid protruding units into door arcs or walkways in compact living spaces.
- Styling ratio: aim for 40% books, 30% plants, 20% art, 10% objects to balance clutter and intent.
| Element | Use | Tip |
|---|---|---|
| Leaning shelf | Anchor piece | Place floor-first; add heavier items low |
| Mini adhesive shelf | Fill gaps | Use light decor and test load |
| Picture ledge | Secure frames | Use in traffic zones for safety |
Materials and durability: wood, metal, and stainless steel builds
Picking the right build affects strength, finish life, and room fit. This section compares common options so readers can match material to use and humidity.
Wood floating shelves vs. metal floating shelves
Wood floating shelves offer warmth and damp vibration absorption. Plywood cores with solid edges resist warping better than low-density board when adhesives are used. Choose sealed finishes near sinks to limit water absorption.
Metal floating shelves and steel trays give rigidity with minimal bulk. Thin trays or steel brackets support light-to-medium loads without heavy hardware. Powder-coated steel resists scratches and moisture better than painted metal in kitchens and baths.
- Integrated lips and rails on metal units help secure small items.
- Match the wall shelf material to room color and decor for a cohesive look.
- Verify included pads and adhesives are rated for the material and weight.
- Check fasten points periodically, especially where steel meets adhesive, to prevent creep over time.
| Material | Best Use | Durability Notes |
|---|---|---|
| Solid or plywood wood | Bedrooms, living areas | Warm look; seal to prevent moisture |
| Powder-coated steel | Kitchens, bathrooms | Scratch and moisture resistant; rigid |
| Thin metal tray | Entryways, display | Lightweight rigidity; often has rails |
Weight capacity and safety: matching lbs ratings to real-world items
A clear read on load ratings helps readers match claimed capacity to real items and avoid surprises. Labels show peak lbs under ideal conditions, not constant everyday use.
How to read capacity claims for adhesive and clamp systems
Evenly distributed loads perform much better than point loads. A manufacturer might rate a shelf for 20 lbs, but that applies when weight spreads across the surface.
Adhesives creep over time. Humidity and heat reduce effective capacity, so treat short-term peaks as higher risk.
- Start tests at 50–60% of stated lbs after full cure, then add weight slowly.
- Watch force direction: shear (along the wall) is safer than peel from front-heavy items.
- Prefer tension or clamp systems where predictable support and safety margins matter.
- Limit glass or dense items and add guard rails to prevent sudden shifts.
| System | Typical Safe Margin | Best Use |
|---|---|---|
| Adhesive | 50–70% of rated lbs | Decor, light storage |
| Tension/pole | 70–90% of rated lbs | Bathrooms, medium loads |
| Clamp/over-door | 60–80% of rated lbs | Closet doors, light items |
Log item weights in shared rooms to avoid accidental overloading. Signs like tilt, creak, or adhesive stretch mean remove items and re-evaluate support. If needed, switch to leaning or freestanding units when target loads routinely exceed safe thresholds.
Installation and removal: clean mounting on painted walls, tile, and glass
A strong bond begins long before adhesive meets paint — it starts with prep and the right conditions. Follow simple steps to reduce damage and improve hold when fitting a wall mounted unit.
Surface prep to improve adhesion and prevent peel
Start by cleaning with 70%+ isopropyl alcohol. Wipe and let the surface dry fully. Dry-fit the shelf, use a level, and mark placement with a paper template.
Warm adhesive pads briefly in your hands on cold days. Press firmly for 30 seconds to activate the bond. In kitchens or bathrooms, choose low-humidity hours and allow a full cure before loading.
Residue-free removal techniques for semester’s end
To remove, support the unit and clear its load. Use slow, steady stretch-release at a low angle. For tile or glass, slide dental floss behind pads or use a plastic card to separate pads without scratching.
- Document placement and keep spare pads for remounting after cleaning.
- Repair minor paint lift with a small touch-up kit; avoid tearing at sharp angles.
- Do not hang units above direct heat or where steam can weaken adhesive.
| Surface | Prep | Removal tip |
|---|---|---|
| Painted | Clean with alcohol; dry-fit template | Slow stretch-release; touch-up paint |
| Tile | Avoid grout; press pads on smooth tile | Use dental floss to cut adhesive |
| Glass | Alcohol wipe; no abrasive cleaners | Slide plastic card to lift pads gently |
Price and value: budget-friendly to premium no-drill shelf options
A small up-front cost can grow into a larger expense if replacements and extras are needed.
Compare tiers: entry-level adhesive options cost the least but may need extra pads or sooner replacement. Midrange packs add stronger adhesives or metal trims for better long-term value. Premium tension systems cost more but deliver higher capacity and durable finishes.
Single shelf vs. multi-pack—a single buy fits quick fixes. Buying a pack lowers the per-unit price and helps make consistent groupings across a room or dorm.

What to factor into total cost
- Initial price and pack discounts versus per-shelf cost.
- Replacement pads, cleaning supplies, and spare parts over time.
- Warranty and return windows as added value beyond sticker price.
| Tier | Typical price | Best value |
|---|---|---|
| Entry | $10–$25 | Occasional display, light storage |
| Mid | $25–$60 | Daily use, mixed materials |
| Premium | $60–$150+ | High-capacity, long-lasting finishes |
Seasonal sales and back-to-school promos lower the sticker price. For students, bundling a few packs for kitchen, bathroom, and desk areas often gives the best mix of price, cohesion, and long-term satisfaction.
Availability and delivery: shipping considerations for dorm move-in
Sync delivery windows with dorm mail policies to ensure a smooth drop-off and fast room setup. Order early so expected delivery aligns with move-in dates and campus pickup hours.
Check package size and weight before buying. Smaller packs are easier to carry from parking lots or mailrooms, especially when elevators are limited.
Prioritize options with protective packaging to avoid bent frames or chipped finishes. Verify carrier tracking and signature rules to prevent delays during busy orientation weeks.
- Look for retailers that offer expedited delivery and student discounts.
- Label packages with the campus-approved format and include phone number for smooth pickup.
- Keep original boxes and inserts for safe transport home during breaks or for returns.
- Coordinate purchases with roommates to consolidate a single pack and reduce duplicate deliveries.
| Consideration | Why it matters | Action |
|---|---|---|
| Delivery timing | Avoids mailroom backlog | Order 2–3 weeks early |
| Package size | Easier carry to room | Choose compact packs |
| Protective packaging | Prevents damage | Pick sellers with good packing reviews |
| Return logistics | Saves time if fit issues arise | Check prepaid labels and return windows |
Alternatives to drilling: wall mounted shelf look without mounting
You can get a mounted look without touching paint by building layered furniture displays and clever risers. These approaches recreate a neat, modern display while keeping surfaces intact for renters and students.
Using studs-free rails and stand-off risers
Studs-free rails rest on top of dressers or consoles and use compression clips to mimic a wall mounted appearance. They give a clean line without any drilling.
Desktop and stand-alone risers
Adjustable desktop risers lift monitors and speakers so gear looks built-in. Modular cubes stacked against the surface reproduce a floating wall shelf vibe while staying freestanding.
- Use anti-slip pads and corner braces to add stability without screws.
- Keep heavy items low and spread weight across the base for safety.
- Tuck cables behind risers for a true mounted finish and tidy look.
| Solution | Best Use | Safety Tip |
|---|---|---|
| Floor-leaning ladder | Display & plants | Anchor base; heavy items low |
| Stand-off riser | TV/monitor lift | Anti-slip pads; check height |
| Modular cube stack | Books & decor | Corner brace; cable channel |
Note: if policy allows one small drill wall mounted anchor for a heavier bracket, choose a removable anchor and limit holes. These tricks help create a fitted look that works in any home.
Design ideas: wall display tips for plants, photos, and collectibles
A simple display plan turns scattered decor into a cohesive focal point for small living spaces. Start with a clear anchor shelf and work outward in tiers.
Group in triangles: place a taller plant, a medium frame, and a small object on staggered levels to create visual flow across a living room or bedroom living room area.
Mix matte and gloss finishes for depth, but keep loads light to protect adhesive mounts. Use micro-planters and propagated cuttings instead of heavy pots to add green without strain.
- Use a photo ledge for easy rotation of prints; it keeps display weight low.
- Follow a 60/30/10 rule: 60% objects/books, 30% decor, 10% plants for balanced composition.
- Add a small mirror above a narrow shelf to bounce light and make the room feel larger.
Lighting tip: install indirect LEDs under floating shelves to highlight items without warming adhesives. Neutral shelves and frames let artwork stand out and keep the overall display calm across connected rooms.
| Element | Why it helps | Placement tip |
|---|---|---|
| Triangular grouping | Creates harmony | Use across two shelf levels |
| Micro-planter | Adds life, low weight | Place near light source |
| Photo ledge | Easy swaps | Mount at eye level for living room |
| Indirect LED | Highlights pieces, safe heat | Run strips under shelf front |
Care and maintenance: keeping shelves level, clean, and secure
Routine checks keep mounts steady and stop small problems from becoming big repairs. Perform a visual inspection monthly, especially after shifts in temperature or humidity. Look for tilt, adhesive pull, or small gaps at contact points.
Use gentle, non-abrasive cleaners and a microfiber cloth to wipe wood or metal shelf surfaces. Avoid solvents that soften adhesives. For allergy-sensitive homes, dust edges and corners weekly to cut airborne particles.
Redistribute storage seasonally to reduce long-term creep on adhesive-backed units. If a pad shows minor separation, relieve the load, press firmly for 30 seconds, and re-seat the pad per manufacturer instructions.

Add small anti-slip dots under objects to lower slide forces on shallow pieces. Felt bumpers at contact points prevent scuffs on the wall and furniture.
| Task | Frequency | Why |
|---|---|---|
| Level & adhesion check | Monthly | Catch tilt or creep early |
| Dust and wipe | Weekly | Reduce allergens; protect finishes |
| Redistribute weight | Seasonally | Prevent long-term pad fatigue |
| Replace pads | As needed | Maintain rated capacity and safety |
Quick pre-trip checklist: clear all items, test adhesion, tighten clamps, and log the date of your last check. Keep a maintenance log and order manufacturer-approved replacement pads when wear appears.
For alternate storage ideas, consider flexible under-bed solutions like a set of under-bed storage bins to shift heavier loads off mounted units before travel.
Common mistakes to avoid with no-drill wall shelves
Many users unknowingly reduce adhesive life with simple habits like skipping surface prep or overloading. These errors lead to peeling, stains, or permanent paint damage.
Common pitfalls include mounting on rough or dusty surfaces that cut contact, or placing dense items that exceed the intended load even if they look small. Humid bathrooms and kitchen steam also weaken bonds over time.
Common pitfalls and fixes
- Skip rough or textured paint — clean and test on a smooth patch first.
- Respect cure times; do not load the shelf early.
- Avoid silicone-coated or low-VOC surfaces unless they’re prepped per manufacturer guidance.
- Keep shelves away from doors, vents, and high-flow corners that create pressure or sudden airflow.
- Use pet- and kid-safe placement to prevent tugs that cause sudden peel failures.
| Mistake | Risk | Fix |
|---|---|---|
| Rough/dusty surface | Adhesive failure | Clean with alcohol; choose smooth area |
| Overloading with dense items | Sag or fall | Weigh items; follow capacity charts |
| High humidity (bathroom) | Loss of bond over weeks | Use tension or leaning storage options |
| Wrong cleaners | Adhesive degradation | Use manufacturer-approved cleaners only |
Always read documentation and capacity charts. When surfaces are textured or imperfect, consider leaning units as a safer alternative to floating shelf installs.
No-drill wall shelves vs. traditional drilled shelving: pros and cons
Choosing between removable mounts and anchored brackets comes down to use, lifespan, and how often someone moves.
Removable mounting options protect painted surfaces and allow fast setup and clean removal. They work well for light-to-medium loads, quick style changes, and student move-ins.
By contrast, drilled systems give higher capacity and longer spans. Anchored brackets hold heavier books and appliances and provide structural confidence for long-term living rooms or home offices.
- Setup & removal: removable units install fast and peel off; drilled units take time but are permanent.
- Price: adhesive kits often cost less up front, while premium tension or clamp options can approach the price of stud-mounted hardware.
- Materials: both approaches offer wood and steel options, but bracket design drives stability and load distribution.
| Factor | Removable mounts | Drilled shelving |
|---|---|---|
| Best use | Rentals, temporary setups | Heavy loads, long spans |
| Price range | Low–mid (adhesive) to mid–high (tension) | Mid–high (brackets, hardware) |
| Maintenance & repair | Occasional pad replacement; easy touch-ups | Paint touch-ups around holes; rare hardware checks |
| Room fit | Bathrooms, kitchens with low humidity, study nooks | Living rooms, heavy-book studies, kitchens with appliances |
Bottom line: choose removable options for short-term flexibility and drilled shelving when capacity and permanence matter most.
Conclusion
Practical, flexible solutions help keep deposits intact while expanding storage and display options. The best picks span adhesive pads, tension poles, clamp mounts, and leaning units so renters and students can match form to need.
Match each shelf type to the surface, expected load, and room use. Prep surfaces, follow cure times, and start with light loads before scaling up. Consider wood or metal finishes, compare pack value versus durability, and follow lbs ratings for safety to protect home surfaces.
Mix and match to build a cohesive look across the living space. With careful install and periodic checks, these options deliver practical storage and a polished display without permanent holes. Choose renter-safe systems that adapt as needs evolve.
FAQ
What types of no-drill shelving options are best for a dorm room?
How much weight can adhesive floating shelving safely hold?
Will adhesive shelves damage painted drywall or dorm walls?
Can adhesive organizers be used in bathrooms and showers?
How should someone prepare a surface for mounting removable shelves?
What are the best options for kitchen and pantry storage without drilling?
How do tension-pole shelving systems compare to adhesive shelves?
Are there residue-free removal techniques at semester end or during move-out?
How should someone match shelf materials to their needs: wood vs. metal vs. stainless steel?
What are common installation mistakes to avoid with no-drill mounting systems?
Can floating shelf displays be arranged safely for books and electronics in a home office?
What should buyers consider about price and value when choosing no-drill shelves?
How reliable is delivery and availability for popular no-drill shelf brands during dorm move-in season?
Are there alternatives that create a "floating shelf" look without any mounting at all?
How to Design a Calm and Productive Study Corner
» See exclusive tips for your home